ShopDreamUp AI ArtDreamUp
Deviation Actions


Suggested Deviants


Suggested Collections


You Might Like…


Featured in Groups


Description
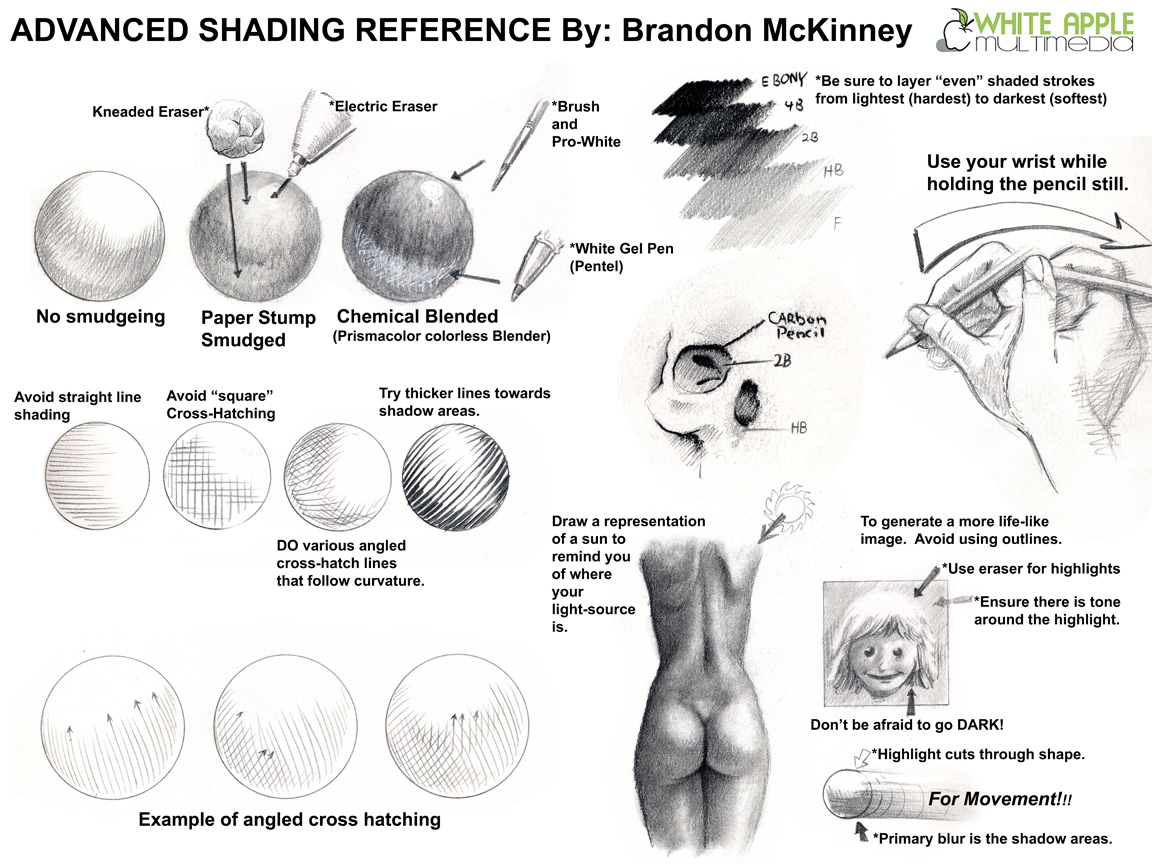
Advanced Shading Tutorial.
Thanks to those who helped inspire this reference file. It took some time for me to come up with a good example to show what I meant.
Here are some techniques that can't really be 'shown' unless you're standing in front of me (Smile)") .
.
1) Use your peripheral vision to see "tone" and not "shape" when doing even shaded tone. Do not use preasure either. Use a medium strength when placing each stroke. Place each stroke side-by-side.
2) If you plan on rendering the entire picture in 'pencil', then treat the pencil as if it were a brush. Basically you are applying pigment to the paper. This will help you with getting in the mind-set for the shading. You will need to switch back to your normal 'drawing' mode when you go to do the finer detials.
3) Leave your details for the very end. This will cut down on smuding. Nothing's worse that watching all your hard work get swept away over time because your details got smudged away.
4) Don't be afraid to erase. Many artists that are starting out think that if they make a mistake they should ball the paper up and throw it away. Others keep the mistakes in the picture. EARSE IT! Keep erasing if you have to. Make sure every line is what you intended! now, if you ruin the paper...then throw it away (Wink)")
5) The best strokes are the quickest strokes. The slower the stroke, the more errors and crooked lines occur. The exception to this is when you want a very LIGHT stroke. Then you ahve to apply it slowly and lightly. Practice making shaded tones on a sheet of paper prior to drawing. This gets your mind in the mood and it puts the 'memory' in your muscles.
6) Practice going hard and soft with your preasure! The hardest thing to do for most people is doing a light stroke. Make yourself aware of the lead against the paper. Barely let the lead touch the paper.
7) At the very end, when you feel you've finished, get out your darkest pencil and search for areas that would be "black." Like wise, get out your eraser or Pro White and hit your highlights again. Also, erase smudge lines around objects (unless there is tone there on purpose.)
I tried to make this visual tutorial a little more self-explanatory. If anything is confusing, just ask me.
ENJOY!!!!
Thanks to those who helped inspire this reference file. It took some time for me to come up with a good example to show what I meant.
Here are some techniques that can't really be 'shown' unless you're standing in front of me
1) Use your peripheral vision to see "tone" and not "shape" when doing even shaded tone. Do not use preasure either. Use a medium strength when placing each stroke. Place each stroke side-by-side.
2) If you plan on rendering the entire picture in 'pencil', then treat the pencil as if it were a brush. Basically you are applying pigment to the paper. This will help you with getting in the mind-set for the shading. You will need to switch back to your normal 'drawing' mode when you go to do the finer detials.
3) Leave your details for the very end. This will cut down on smuding. Nothing's worse that watching all your hard work get swept away over time because your details got smudged away.
4) Don't be afraid to erase. Many artists that are starting out think that if they make a mistake they should ball the paper up and throw it away. Others keep the mistakes in the picture. EARSE IT! Keep erasing if you have to. Make sure every line is what you intended! now, if you ruin the paper...then throw it away
5) The best strokes are the quickest strokes. The slower the stroke, the more errors and crooked lines occur. The exception to this is when you want a very LIGHT stroke. Then you ahve to apply it slowly and lightly. Practice making shaded tones on a sheet of paper prior to drawing. This gets your mind in the mood and it puts the 'memory' in your muscles.
6) Practice going hard and soft with your preasure! The hardest thing to do for most people is doing a light stroke. Make yourself aware of the lead against the paper. Barely let the lead touch the paper.
7) At the very end, when you feel you've finished, get out your darkest pencil and search for areas that would be "black." Like wise, get out your eraser or Pro White and hit your highlights again. Also, erase smudge lines around objects (unless there is tone there on purpose.)
I tried to make this visual tutorial a little more self-explanatory. If anything is confusing, just ask me
ENJOY!!!!
Image size
1152x864px 586.67 KB
© 2006 - 2024 Snigom
Comments223
Join the community to add your comment. Already a deviant? Log In
sure! I am almost getting it on shading, especially highlights